Soldering is one of the most useful skills a sound technician can have. It can seem daunting at first, but it is surprisingly easy once you know how. It can help you understand your equipment and signal flow better, save you money, and there’s nothing quite like whipping out a soldering iron and saving a gig to silence the doubters. Entire books have been written on the subject, and it takes practice to perfect it, but I’m going to outline the very basics you need to get started.
A note on safety!
Soldering irons, unsurprisingly, get very hot! Keep your work area clear and well ventilated, only hold it by the handle, always put it back in its holder and don’t leave it unattended until it has cooled down. Remember that the things you are soldering will also get hot. Be careful not to melt the glue keeping a PCB in place, for example. I also need to point out you shouldn’t solder something in situ above you while lying on your back. Thanks, Tim…
Equipment
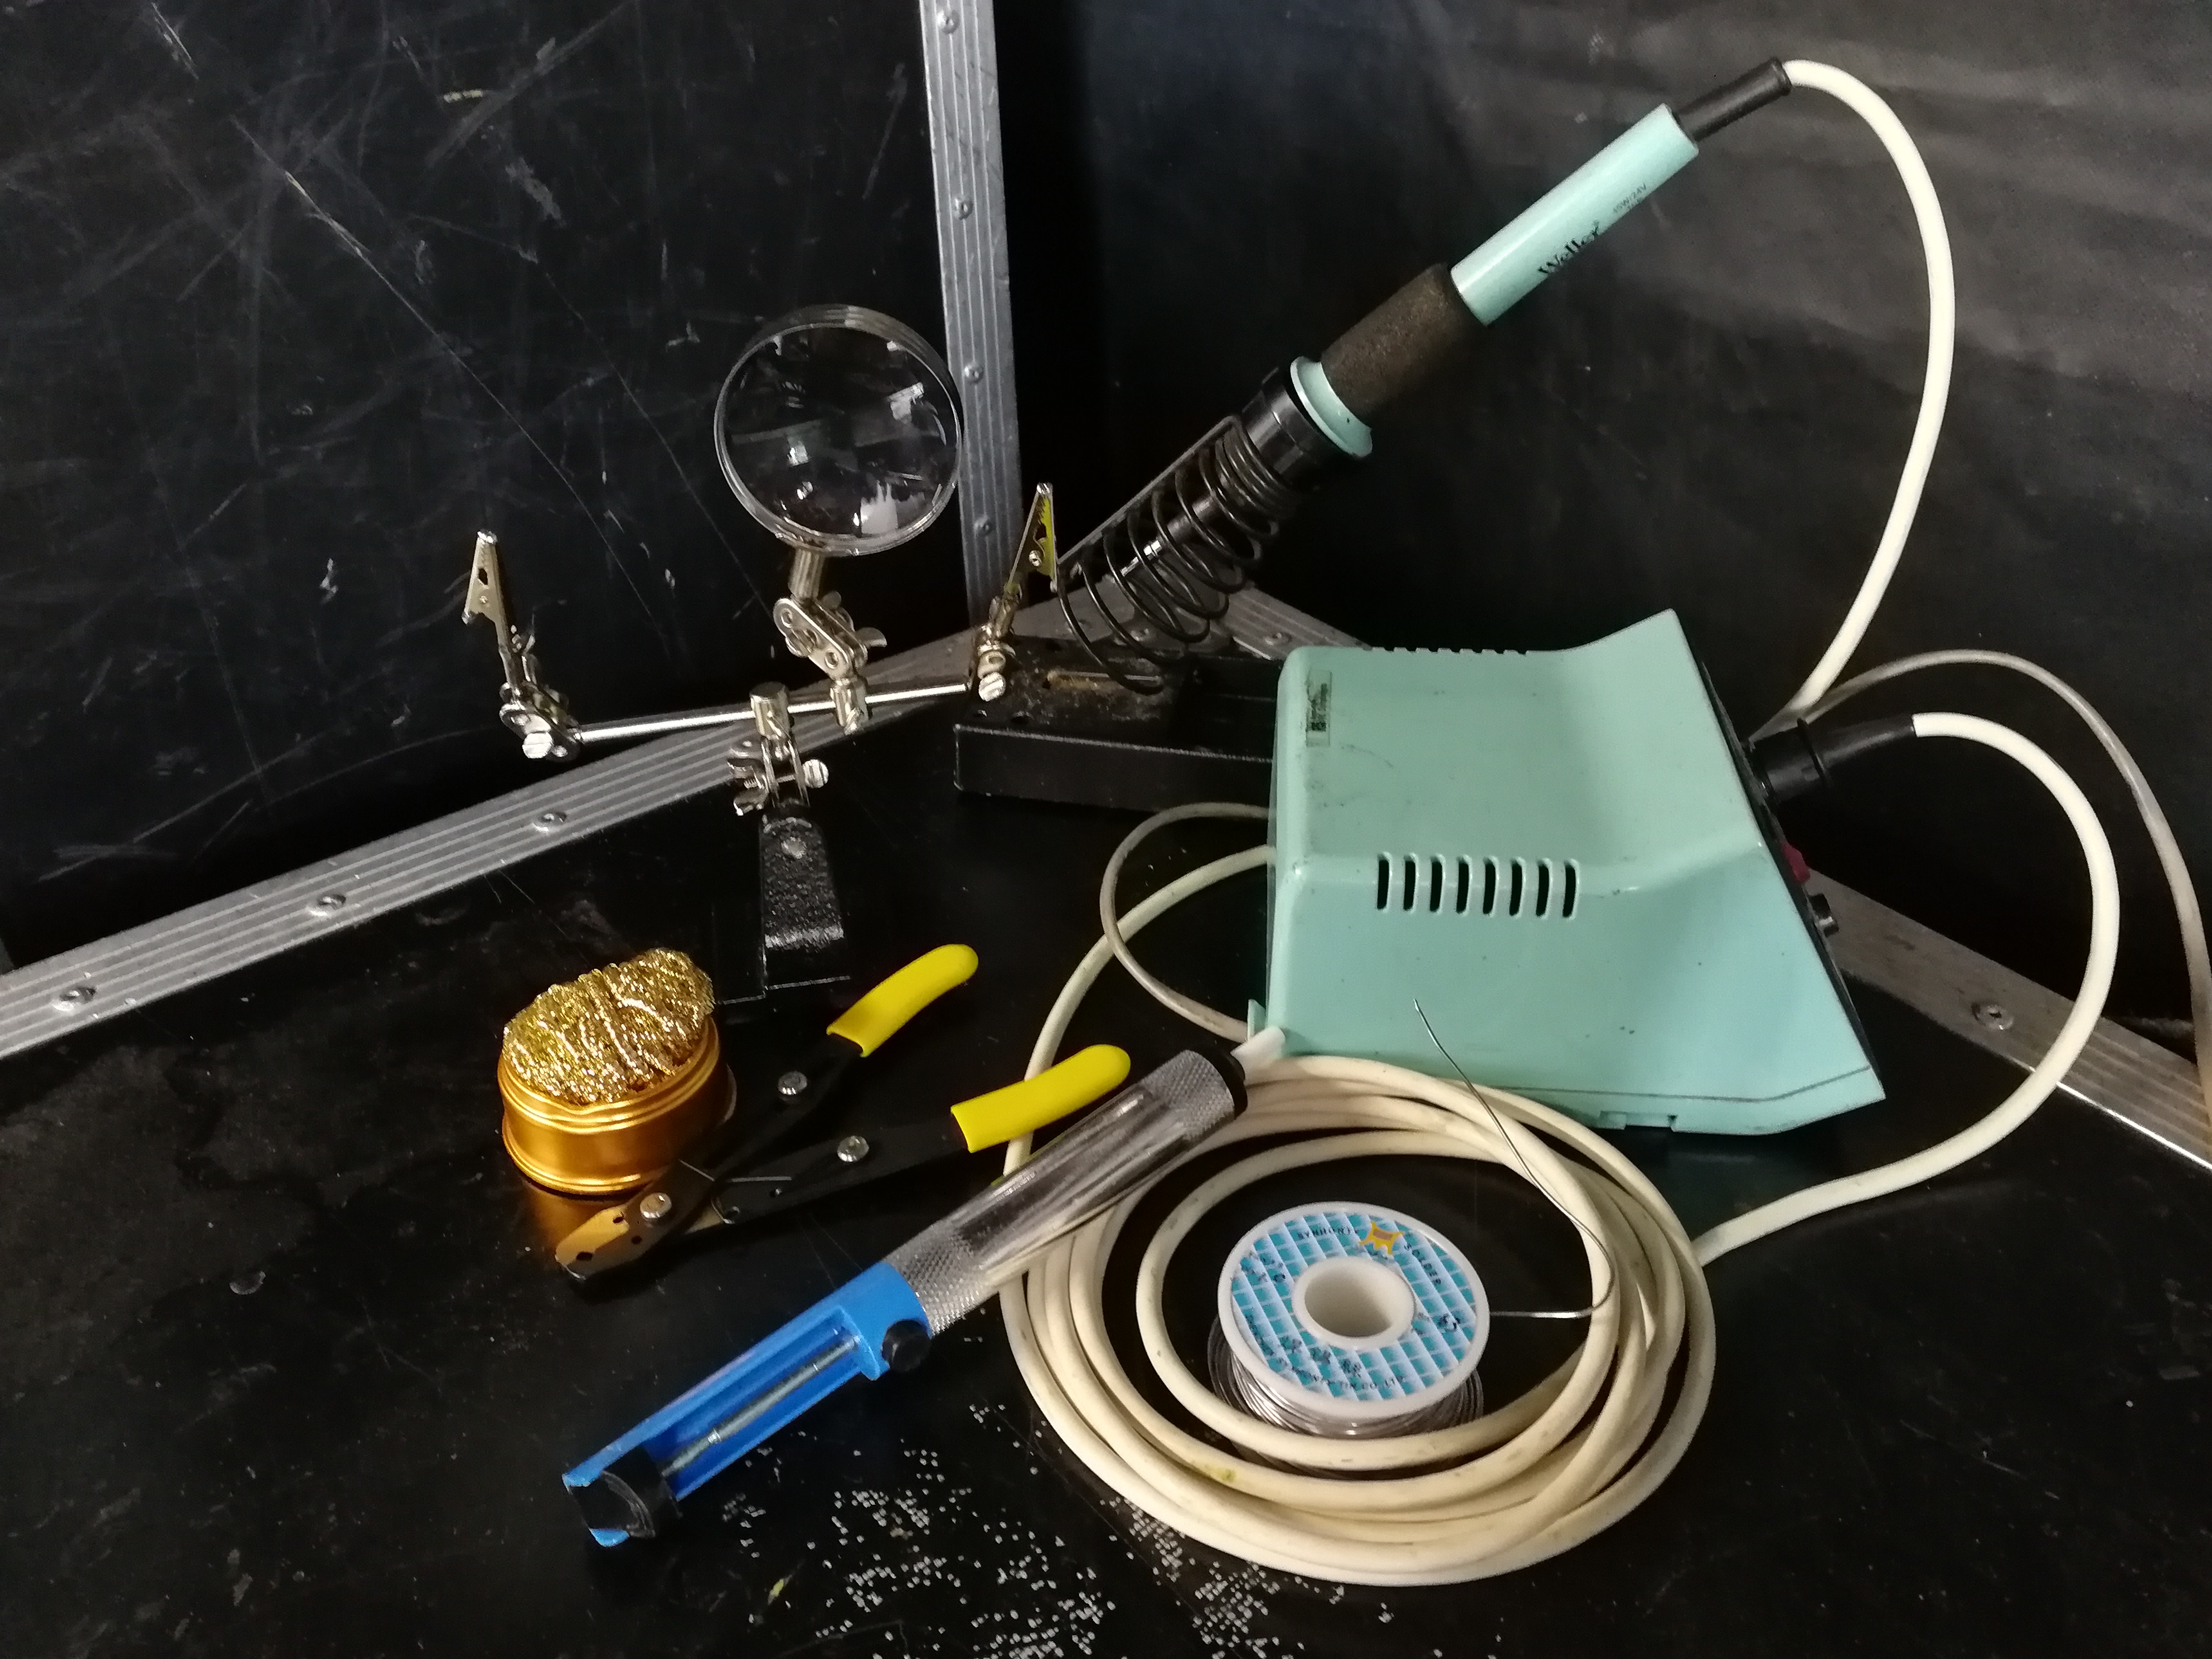
You will need:
A soldering iron!: Buy the best you can afford because it will last you for years. There are a few different types, each with their own advantages. Mains-powered irons can either be standalone or come with a station, which can control the temperature and give you a readout of it. Stations also include holders and sponges, so you have a neat setup. Battery or gas-powered irons are a lot more portable, and you don’t need to rely on a mains supply to use them. Non-temperature controlled irons might struggle to solder bigger items because they absorb the iron’s heat until it drops too low to be effective.
Tips: There is a whole world of iron tips out there. For sound work, you’re most likely to need an iron-plated conical tip. They need to be replaced periodically, so keep a few and clean them regularly.
Solder: Many people swear lead solder makes the best joints and is the easiest to work with, but it is also poisonous and bad for the environment. Lead solder has been outlawed, in the EU at least, for use in plumbing and consumer electronics due to its hazardous properties. It is still available for private use. There are a variety of lead-free solders on the market, but they still emit some toxic fumes, have a higher melting point, and the resulting joins may be more brittle than traditional lead ones. Whichever you opt for, pay attention to the percentages of each metal present in your solder: different combinations will have different melting points and strengths. 60% tin, 40% lead is the standard alloy traditionally used for electronics. Most solder comes with a flux core, which is a resin (rosin in the US) that helps bind and strengthen your joints and keep them clean. You can buy your solder and flux separately if you really want to, but that tends to be used for advanced repairs and is unnecessary for beginners.
Sponge and metal wool: Back when all solder contained lead, cleaning your tip on a damp sponge was fine. However, lead-free solder works at a higher temperature and the water from the sponge can cause the iron to dip below your optimum operating point, so repeated cleanings can cause the solder to crack and penetrate the tip. Using brass wool avoids this problem.
Solder sucker/desoldering wick: These help clean old solder away before you work your new join. Don’t just melt and reuse the solder that’s already there!
Helping hand iron touching
Soldering board/helping hand: You can make a soldering board out of some wood and old cable connectors, so you just plug the cable you’re soldering into its corresponding socket on the board to keep it still. You can also draw wiring diagrams above each one to refer to as you go along. For some applications a “helping hand” might be more useful: it consists of a magnifying glass and two alligator clips on a heavy bass, so you can hold cables in place and get a better view while working.
Wire strippers and cutters: You can get by with just a knife, but a good set of wire strippers will save you time and the frustration of accidentally cutting through the entire wire you were trying to strip.
Method
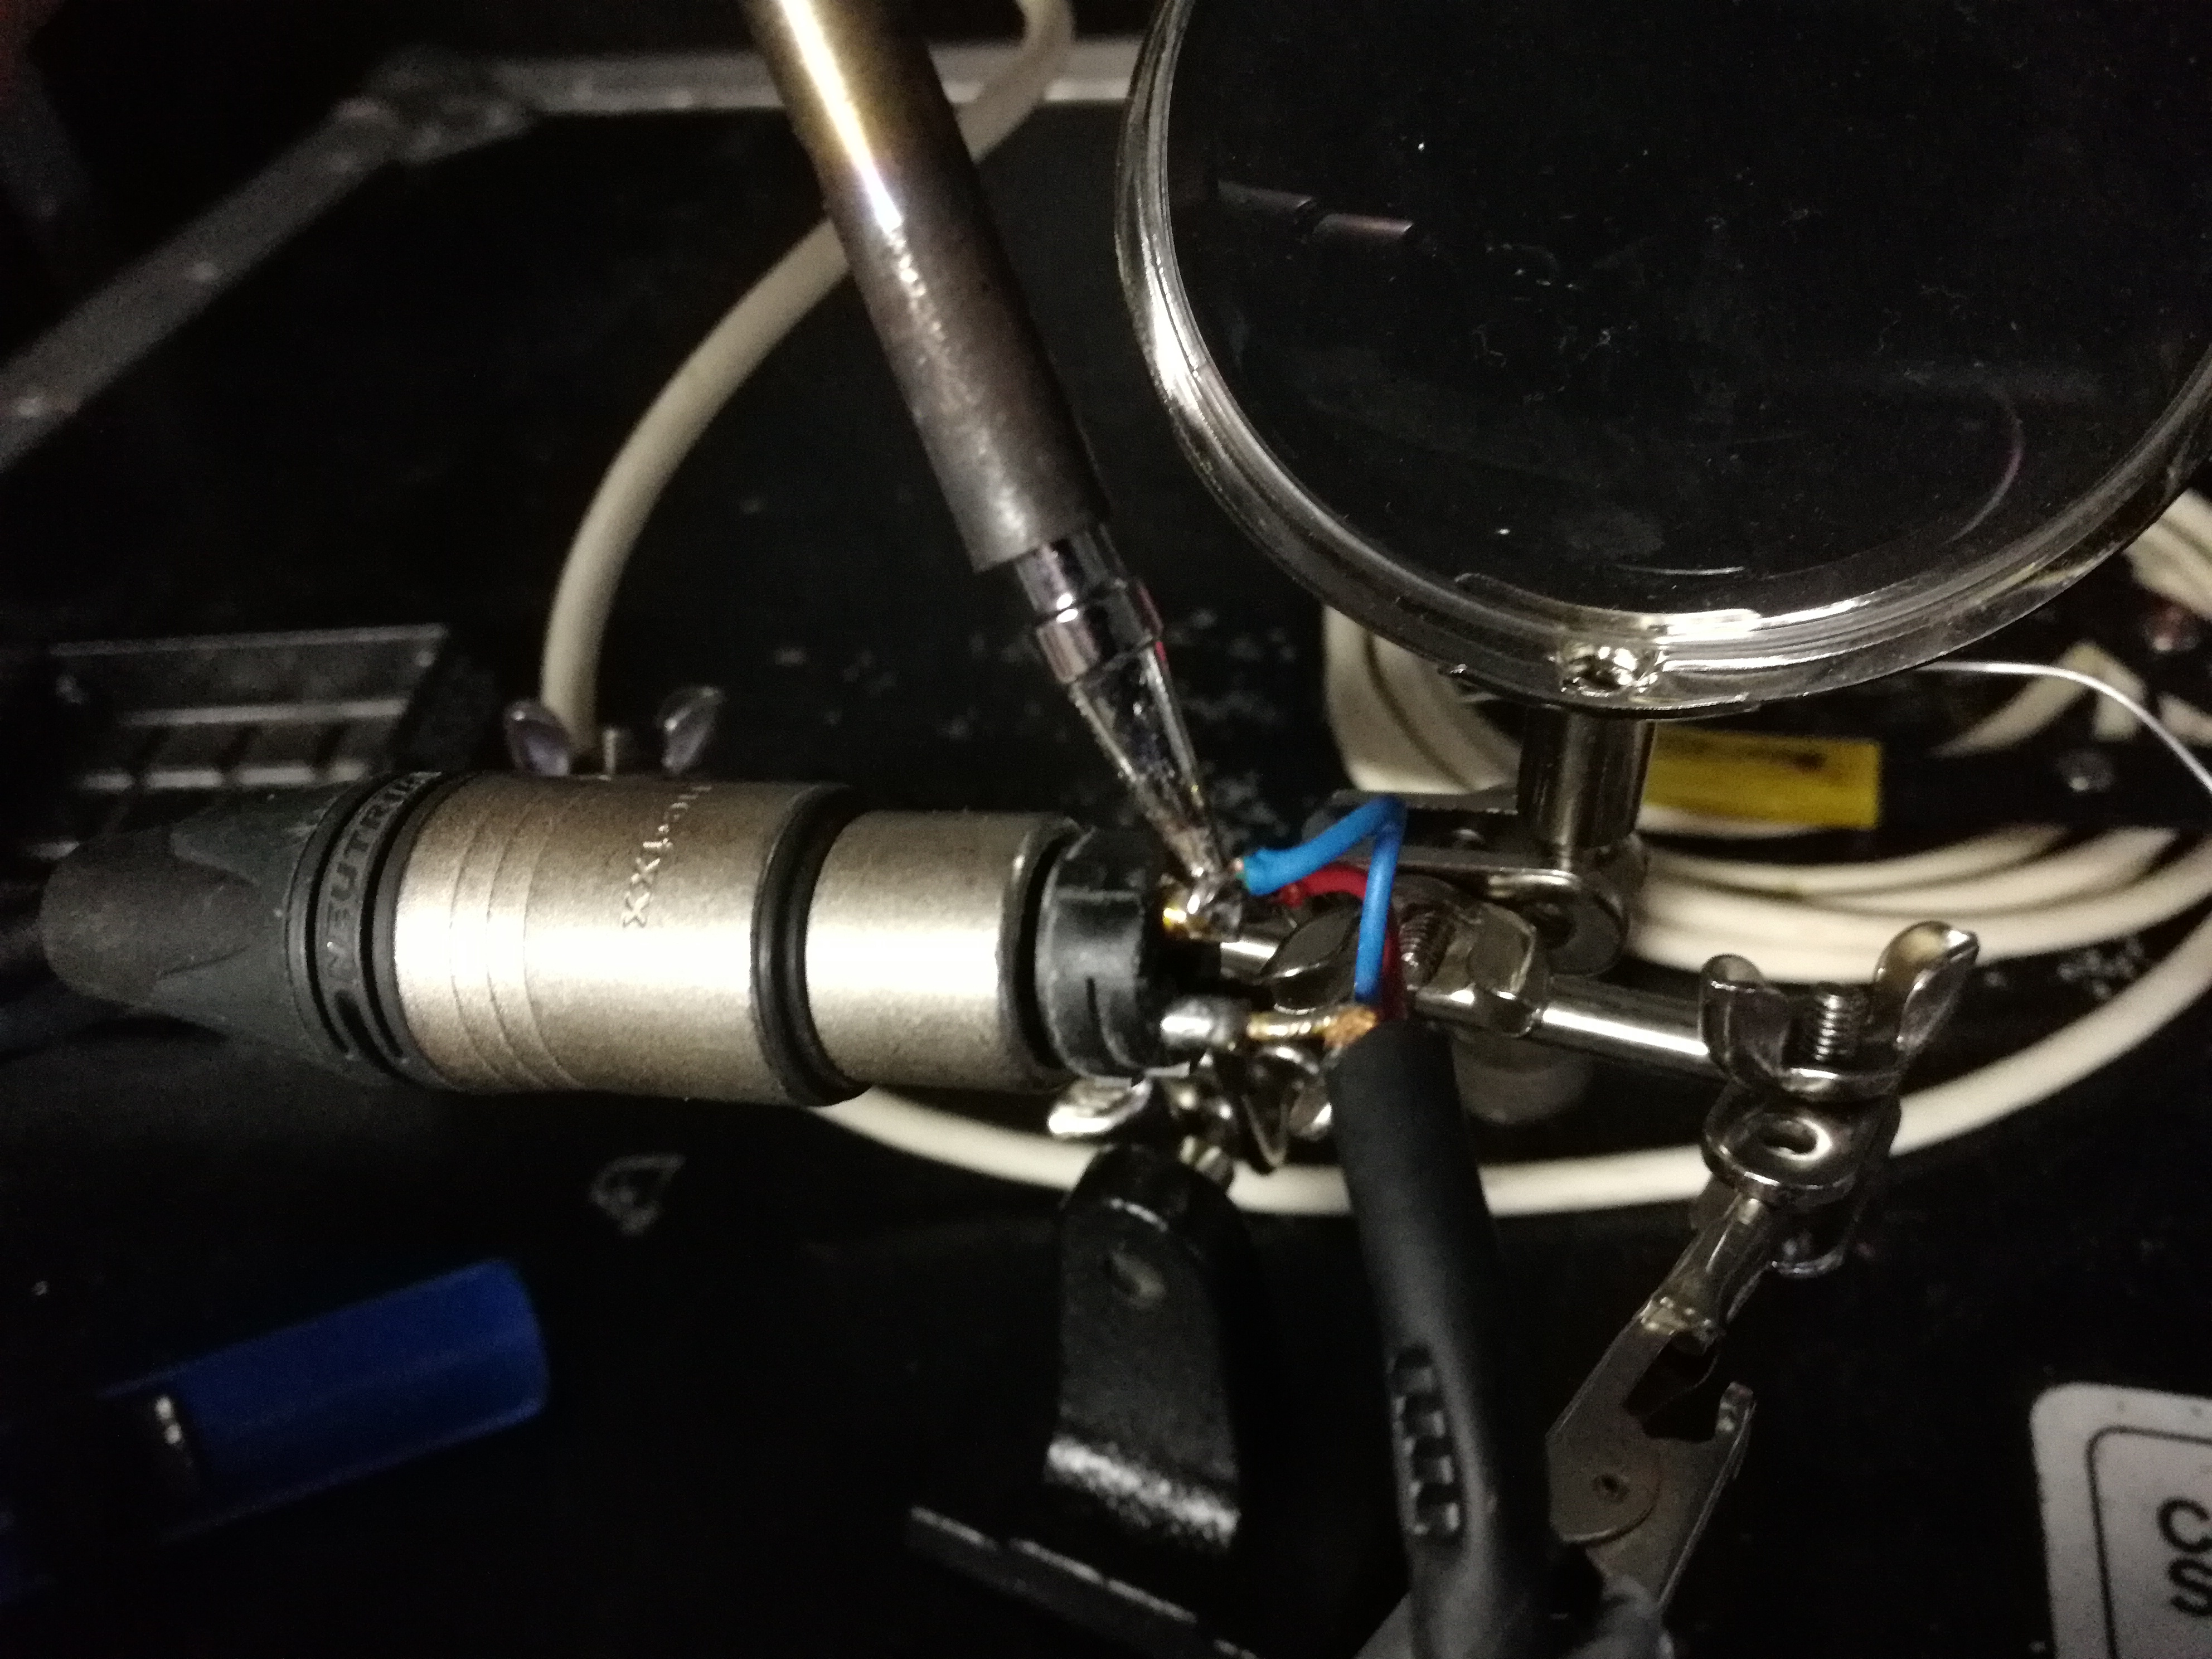
Let’s take resoldering a broken leg on an XLR as an example.

XLR Short Earth
If you’re using a new iron tip, you can “tin the tip”: heat the iron up and melt a thin layer of solder evenly over the tip, so it’s shiny. This improves heat transfer, protects the tip from oxides and makes it easier to clean. Regularly cleaning and re-tinning the tip will improve the quality of your joins and help the tip last much longer.
Once everything is in place, you first need to remove the casing around the wires. Make a note of which wire goes where (if you ever get confused, just refer to a diagram or open another cable on the same end and compare it to the one you’re fixing). If there isn’t much wire left to work with, don’t be tempted to make a tight fix. It will take too much strain when the cable is moved and will break again soon after (The one exception to this is that some people purposefully make the earth leg shorter, like in the photo, as it is stronger and can take the strain instead of the other pins. This can be tricky to do, and subsequently repair, so is more of an advanced technique). Desolder the other legs of the cable, trim them to the same length and strip the wires back until you have just enough to work with. If you strip too far back, the metal from different legs can touch and cause all sorts of signal problems. If the broken leg is still long enough, just remove the old solder from its join and leave the other two legs attached.
Take the iron in one hand, and hold out a length of solder in the other. Then the important bit: heat the wire, not the solder! You need to heat the wire and its connector, so they melt the solder. If you heat the solder directly and try to drop it onto the join, it will just cling to your iron. While holding the iron on one side of the area, you want to join, touch the solder onto the other side. It should melt and flow around the wire and connector, binding them together. Avoid breathing in the fumes! Keep going until the whole area is covered, removing the iron as soon as you can to minimise the amount of extra solder you’ll need to clean off it. It should only take a few seconds to heat the wire; if nothing happens when you touch the solder to the join, or it only melts when you’ve held the iron in place for a long time, your iron isn’t hot enough. The solder on the join should look clean, shiny and smooth. If it is dull or uneven, it is a sign of a bad join and is liable to break again. You can just desolder and do it again until it’s right!
Finally, put the components back together and test your XLR with a cable tester. Never put an untested cable back into use after soldering it. Turn your iron off, put it somewhere safe until it’s cooled down, and enjoy your new skill!
Additional Resources
Illustrated easy guide to soldering (electronics-focused)
Once you are more comfortable soldering, you might want to make your own phantom power checker