How to Make an Awesome Audio Rider
An audio rider is essential to every gig. There can be a lot of confusion over what it should entail and how best to present the information, so here is how to make a clear, concise rider and the pitfalls to avoid. Much of this might seem obvious, but even people on arena tours make some of these mistakes. If you already know everything in this post, share it with your musician friends who don’t have an engineer yet so they can make great riders too.
Is my favourite beer really that important?
When people hear the word “rider” they tend to think of a rock and roll list of demands for lots of alcohol and no brown M&Ms in the dressing rooms. That is indeed part of the rider, but the term refers to the entire contract for a gig. It covers fees, security, food, drink, technical information, and anything else that is required on the day. The audio rider is probably the most important part of that because without it the promoter doesn’t know what equipment and personnel they’ll need for the gig to happen. Your audio rider should, at the bare minimum, list the instruments you’re bringing, how many people are in the band, and which members sing. If you only send one document to the promoter, it should be your audio rider, not a list of food and drink. Seriously.
Advance the show in advance!
Your rider must be sent in plenty of time before the show. Organisers make budget decisions and might need to hire extra equipment depending on your requirements, so you have to give them enough time to sort that out and negotiate who will pay for any extras. This is true of festivals in particular because they might be juggling the needs of dozens of acts over several days and stages. There can be many layers of communication between the artist, the festival organizers, and the audio supplier so the process can be slow, and setting the equipment up can take days. It’s no good complaining that you sent your rider on Friday when the equipment list got agreed weeks before and got shipped to the site on Tuesday. If the organiser has a deadline for riders make sure you meet it and preferably send it much earlier.
Start with the basics
If you’re just starting out or you don’t have your own engineer, you don’t have to worry about which mics to ask for or even which things need to be mic’ed. Just say what you’re bringing and the house engineers can make a channel list for you that is suitable for the room. For example, some venues might warrant every drum being mic’ed up, but smaller venues might work better with just a stereo pair above the kit. If you have no strong feelings on the matter let them decide. You do need to tell them exactly what you have. “1 x drums” is not helpful. There is no such thing as a “standard” drum kit. List each drum you have, how many channels of playback, how many people sing and where they stand, etc. Don’t just lump things together and presume it’ll be obvious. Mentioning pedalboards isn’t necessary unless they contain something that should plug into the line system, like a Sans Amp. When listing vocals, explain which musician they belong to. A band with drums, bass, guitar, and three vocals could mean anything between three and six people, so make it clear.
It is not necessary to list the brands of your instruments. They are only relevant if the promoter is hiring the gear for you or if you’re sharing backline with other bands who might want to know what they’ll be using. If someone has several amps or keyboards, differentiating them by brand can be helpful, but other than that it just takes up space. How a musician performs has far more influence on the sound than the make and model of their gear so the house engineer is unlikely to need this information before soundcheck.
Advance the plot
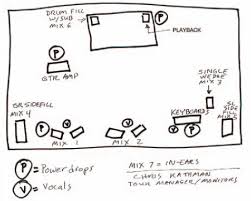
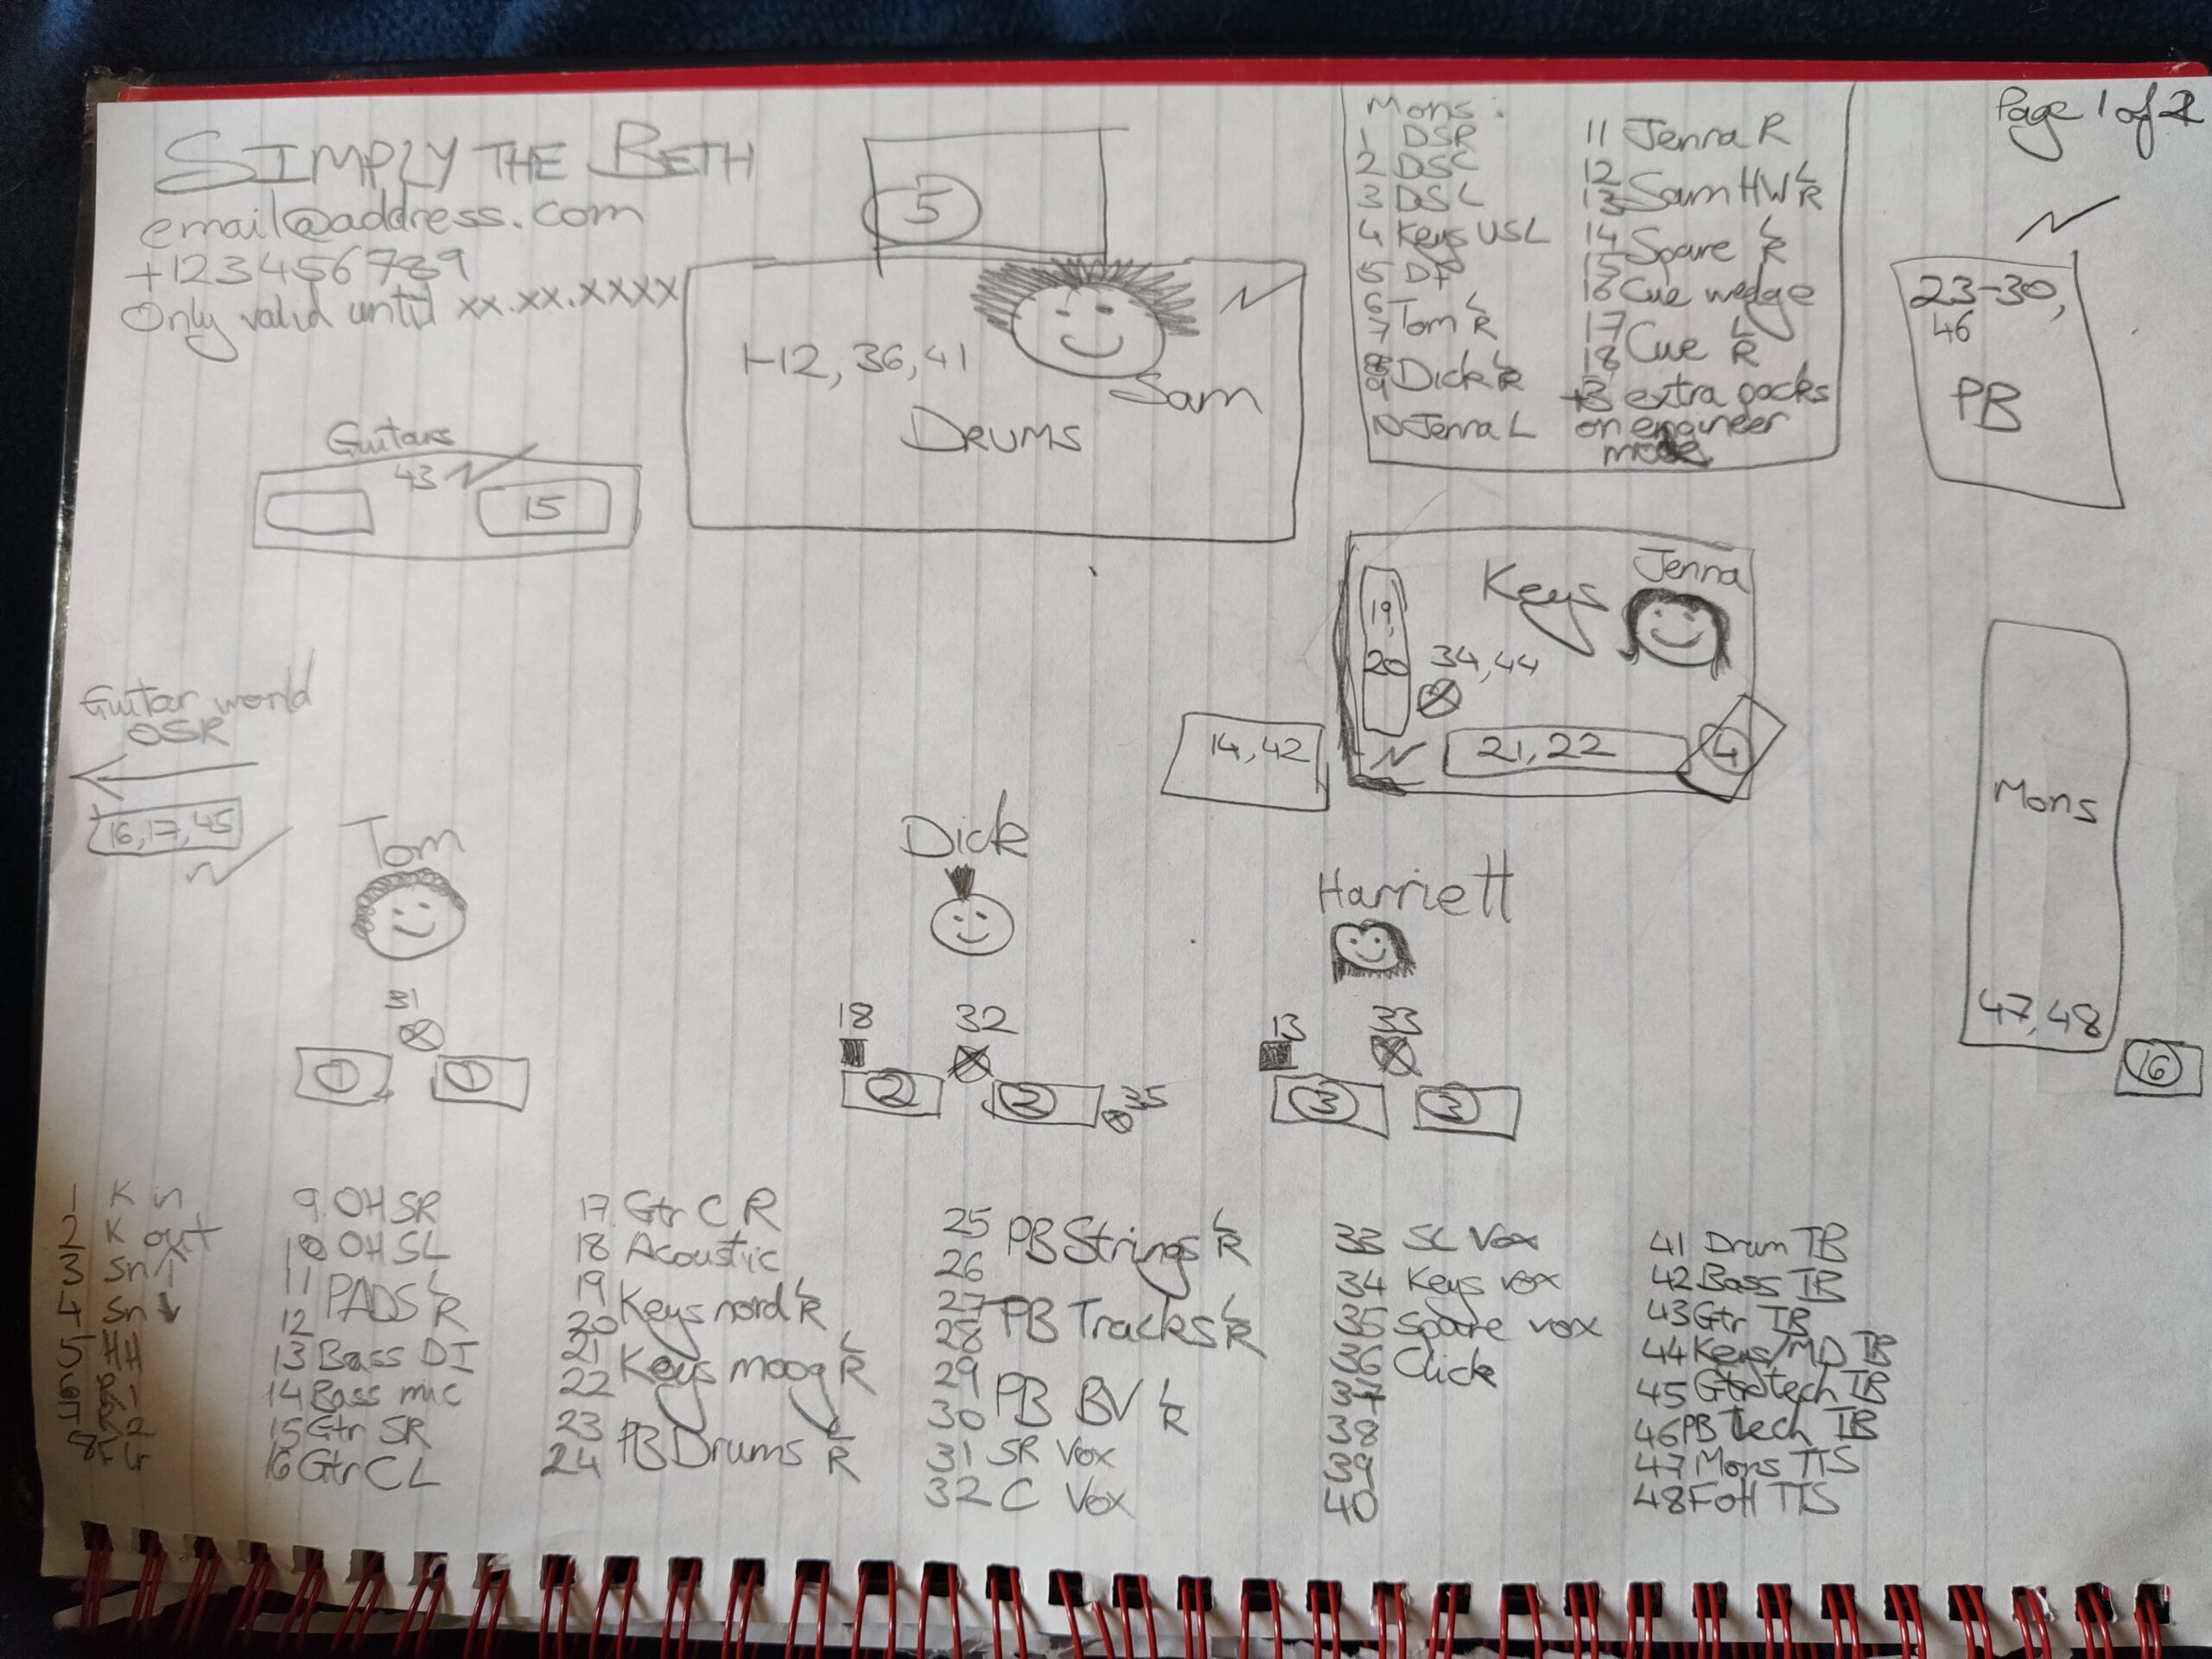
The next step is to make a stage plot. Draw where each instrument and vocal mic goes. This is much more useful than a list of gear because the techs can make decisions about how to run cables and plug everything in, what to do for monitors and how best to arrange the changeover. There are apps that will help you to do this (https://soundgirls.org/list-of-apps-and-software-for-designing-stage-plots), but using something like MS Paint or even drawing it by hand is perfectly fine, as long as it’s clear. It doesn’t need to be a photo-realistic masterpiece of your band rocking out in all its majesty, just show where everything goes and what it is. Less detail is often better because there are fewer distractions on the page. Figure 1 was drawn in Paint and shows all the information you need. Numbers in brackets in the rest of the article refer to notes in blue on the plot.

A perfectly professional stage plot, made for free in MS Paint
If you have a channel list, add the corresponding channel number where each one gets plugged into the line system. For example, write the number by the guitar amp because that’s where the mic goes, not where the guitar itself will be played (1). If you have wireless mics, put the numbers where the mics will be at the start of the set and make a note that they’re wireless (2) and where the receivers need to be (3). Things like drums and playback that are all in one place can have one set of numbers, e.g. 1-10, rather than positioning each number beside each drum or playback output (4). Style your inputs and monitors differently so it’s easy to see which is which at a glance (5).
Mark each place where you would like a power drop. If you have your own extension leads or some instruments are close enough to plug in together, just mark the best position for the venue’s power drops instead of everything that needs electricity. Don’t forget power for pedalboards (6)! If you’re performing in a foreign country, be sure to specify what kind of sockets you require, e.g. “110v USA” for American equipment or “230v UK” for U.K. power. Don’t presume every country in a region has the same plugs. British plugs are different from French plugs, which are in turn different from Italian ones. Mark each individual drop if you’re using a mix of your own and locally hired gear (7). This is especially important for artists traveling between 110v and 230v systems because they’ll need special transformers, which might have to be hired in as an extra. Certain models of backline can be particularly sensitive and rely on accurate voltage in their supply, so a travel adapter will not suffice.
Put your channel list at the bottom of the stage plot, as long as it won’t make it too cramped (8). Leave things like mic choices to a separate channel list on a separate page, but having each instrument and its number on the same page as the plot makes things clear and faster to see, especially during busy changeovers where you don’t want to keep flipping back and forth between pages.
Colour coordination might seem like a great idea, but it often ruins your channel list when it’s printed in black and white. Strong colours can also make text hard to read in low-light conditions, like backstage.
Going pro – channel list
Once you’ve reached a point where you have certain mic preferences, you should include a channel list separate from the stage plot. You should have a column for channel number, instrument name, mic, stand, whether the mic needs phantom power, its position, and any notes. Things like gates, compressors, whether the drummer plays left-handed (especially if they’re in the middle of a bill that is sharing backline!), or that you’re bringing some of your own mics should be noted here. Channel lists traditionally follow a certain order starting with drums and ending with vocals. If your engineer has a strong preference otherwise that’s their decision, but if you’re sharing backline or an analogue desk they might have to use the same order as everyone else. If you want your channels to be plugged into certain subsnakes/satellite boxes, you can add a column for that. Refer to performers by stage position rather than, or as well as, name. No one at the venue knows who Sam is, but they’ll know where the stage-right vocal should be.
If you know what you want for monitors, list them after the channel list. How many wedges each person needs, hardwire mixes, and wireless IEMs, including whether they’re mono or stereo. Note whether you want certain IEM mixes to have extra packs as spares etc. Feel free to add notes for each mix so the house engineer can get a rough starting point dialed in.
Pro secrets the music industry doesn’t want you to know!
There are some practical points that you might not know if you haven’t worked in-house yourself. First of all, the techs often don’t get the full rider and are unlikely to read all of it even if they do. Make sure everything relevant to your audio requirements is in the audio section of your rider, even if you have to repeat yourself. For example, if you mention that you’re bringing your own mics in the “fees” or “fly dates” section, don’t presume the audio team will see that. Make a note of it on the channel list.
If the act is bringing an engineer/s, say so. Say whether they have a show file, and for which desks. If the house engineers don’t know you’re bringing someone, they’ll waste time making a show file for you that they could have spent getting the stage ready or helping another artist. If certain aspects of the rider are deal-breakers, make that very clear. Although riders are contracts, they are often seen as general guides or wishlists, especially when it comes to mics. If you can’t possibly do your show without something, let them know. Well in advance!
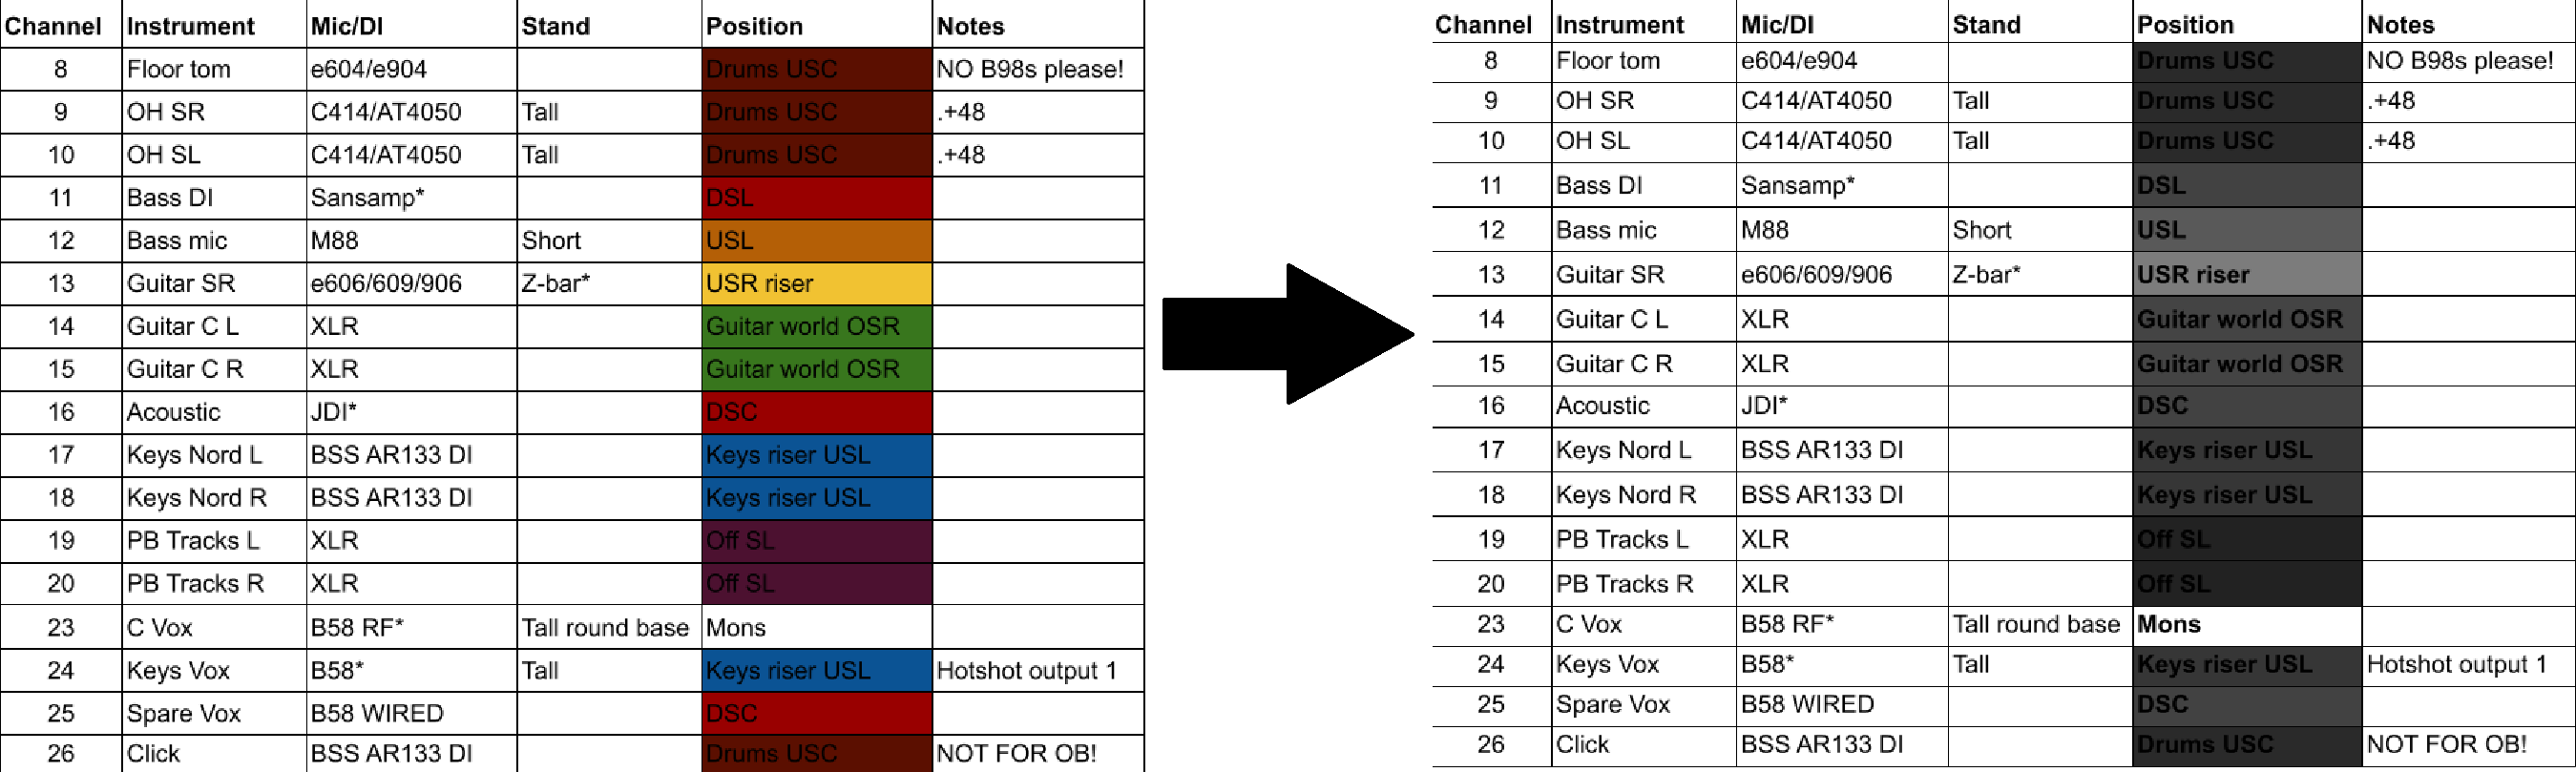
You might be tempted to colour code your channel list according to stage area or subsnake/satellite box, but do so at your own peril! Although some tech-savvy techs like to use tablets or even their phones for their paperwork, most stage plots are still printed out for reference, and nearly always in black and white. Those lovely deep, rich colours you used for your subsnakes will render the information unreadable, and different shades of grey are a meaningless coding system (see figure 2). Dark background colours also make text hard to read in low-light conditions, for example, backstage. If you use colour, use very light and distinct ones and write the colours down as well, e.g. “red 1”, “green 3” etc.
It’s vital that you update your rider as soon as anything changes. Make sure you update both the stage plot and channel list, and double-check that they match! One of the biggest sources of confusion is mismatching plots and lists, as it’s usually impossible to tell which is the right one. If you have several set-ups, e.g. a vocalist who performs with a band or to track depending on the show, make separate riders for each one. If you’re adding guest vocals or a string quartet for a special performance, make a special rider. If you have different demands depending on whether it’s a festival or your own headline show, send the paperwork that reflects that. The whole point of a rider is to make sure you have what you need, so the organiser needs to know exactly what that is every time.
One of the biggest mysteries in live events is that of the disappearing current rider. Even if you make yours perfect and send it away in plenty of time, there are beings that can intercept it and give the venue one of your old riders, or in some cases a rider for a totally different act with your name on it. How or why this happens no one knows. Maybe it’s gremlins or tralfamadorians. The only way to really circumvent them is to have a link on your rider for the most up-to-date version, e.g. your website or a Dropbox folder (9). Include the name, role and contact details of your designated grown-up so they can answer any questions the venue might have (10).
Help us to help you
Keeping your rider up to date might seem like a lot of work, but once you’ve made the first one it gets much easier. It is definitely worth spending the time to get it right. The venue can get a lot done before you even arrive, and can set you up much faster if they know what to expect. This is particularly important on festival stages where changeover time is at a premium and the stage crew might see 20-40 riders over the course of a weekend. Making yours neat and easy to understand makes changeover and troubleshooting much easier, leaving you time to concentrate on getting the best sound for your set. Help us to help you have the best show possible, and those non-brown M&Ms will be all the sweeter after.
List of Apps and Software for Designing Stage Plots