Empowering the Next Generation of Women in Audio

Join Us

Teaching Kids about Sound

For the past ten years, I’ve been the sound faculty for a technical theatre conservatory.  Students spend two years in this conservatory learning as many elements of technical theatre as possible, and generally, can declare one area as their focus.  I can count on my two hands, the number of students that have come in with sound as their focus, and, by the way, less than half were women. I was always told by my students that sound is scary, or too hard, or wasn’t ever taught in high school and middle school when these students first burst into the theatre world.

“Who ran sound for all of these musicals that you did in middle and high school,” I would ask. The number one answer? Someone’s dad. Someone’s dad would watch some YouTube videos, come in while the kids were in class, and throw together some kind of sound system that would be enough to get by. A dad and maybe the school’s technical director would run sound for the shows during the performance, and maybe let a kid stand behind the console, hit “GO” in QLab, or help put mics on other kids.

I suppose this exposure is better than nothing, but what we need to do is get kids hooked on sound from the very beginning of the process so they can understand what they’re doing instead of mimicking the few motions that they’ve been taught. This blog will feature some great resources for teaching sound to kids. If you’re the drama teacher for your school and also live in a world of “sound is scary, don’t make me do it,” this blog is for you. You don’t really need to understand everything about sound to use these resources, but checking them out might also teach you a thing or two….so, BONUS!

Elementary Years

If you’ve read any of my blogs before, you know how I feel about music and sound—they’re in a deeply committed relationship, and will be FOR-E-VER!  If you want to start kids on the track to audio, get them excited about music as early as you can.

One of my favorite activities to spark a budding music mind is the “Pictures at an Exhibition” project.  Modest Mussorgsky wrote this brilliant Suite in honor of his artist friend, Viktor Hartmann. The ten movement Suite was to be an aural representation of Hartmann’s work. So here’s the project: Give the kids some paper and crayons, play each of the ten movements of the Suite for them one at a time, and tell them to draw what they hear.  I first did this project with 30 kindergarteners, and the results were astonishing. Without knowing the titles of the movements, they were mostly able to accurately portray what Mussorgsky was looking at when he wrote his music. This project introduces a very crucial element. It teaches kids to not only hear music but to listen. Music is a super-easy way to introduce active listening skills.

A great next step is to introduce the concept of a sonic field. Turn the lights off and clap. Now move a few steps back, and clap again. Ask your students to tell you if you were closer or further away the second time. Rinse and repeat these steps several times, and before you know it, you’ll have a room of 30 little sound engineers in the making. Check out these other great projects for tiny technicians:

Sound Experiments for Kids

Science Snacks

Middle School Years

Middle school is the perfect time to start introducing kids to the nuts and bolts of sound.  Building XLR cables is a fun and engaging project that also lets kids see the basics up close and personal.  I know soldering with kids seems like a scary prospect, but if I can teach my ten-year-going-on-sixteen-year-old how to solder, so can you.  Sometimes it feels impossible to teach a skill that you’ve seemingly just known forever, so remember to keep it simple, go slow, and over-explain everything.  I stumbled upon this great blog about teaching kids to solder. It features lots of resources for project kits and lists everything you’ll need to get started.

You Should Teach Your Kids to Solder

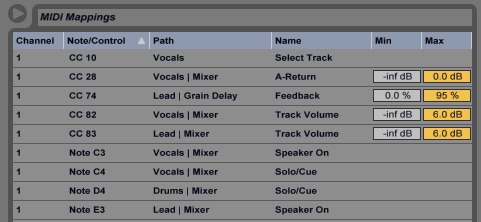
Once you have successfully built your cables, let your kids experiment with connecting a microphone to a speaker, and then introduce a small analog mixer.  I love to use my adorable little Yamaha MG10 for beginner projects. It’s small enough to keep kids from being overwhelmed but has enough start teaching the ins and outs of the mixing console.

A key ingredient to teaching middle school kids is being able to connect to them on their level. Incorporating their interests into your lesson will help you successfully plant those tiny seeds of knowledge.  What better way to connect with middle school kids than with a cell phone? There’s a great game app called Aux B that lets users patch a sound system bit by bit. It starts simple, and throughout 40 free levels, gets pretty complicated.  The game does not allow you to advance to the next level until you have successfully passed the current level and achieved blaring music through your speakers. This is a super fun way to introduce signal flow. I like to have my students race against each other on this game, and then the winner gets the glory of being the ultimate Patch Master!  Here’s the link:

Aux B

High School Years

High school.  Here’s where we get to start having some fun with audio.  SoundGym is a super fun and useful ear training program. (SoundGirls has free subscriptions, email us at soundgirls@soundgirls to receive yours) It helps users identify frequencies and the differences between them, panning, and gain differences.  It’s very user-friendly, so it’s easy just to plug and play. The free version of this program does have some limitations on how much you can do, but it’s enough to be useful.  I find this program the most beneficial when used on a regular basis. After all, practice makes perfect! Here’s the link:

SoundGym

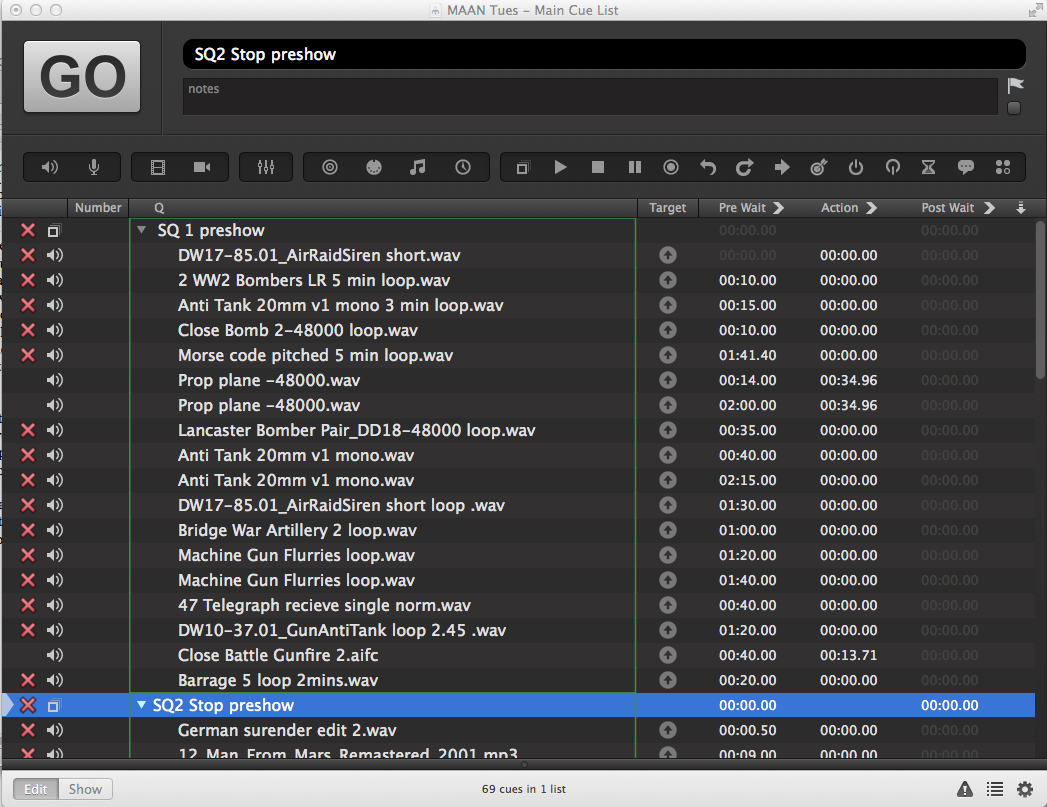
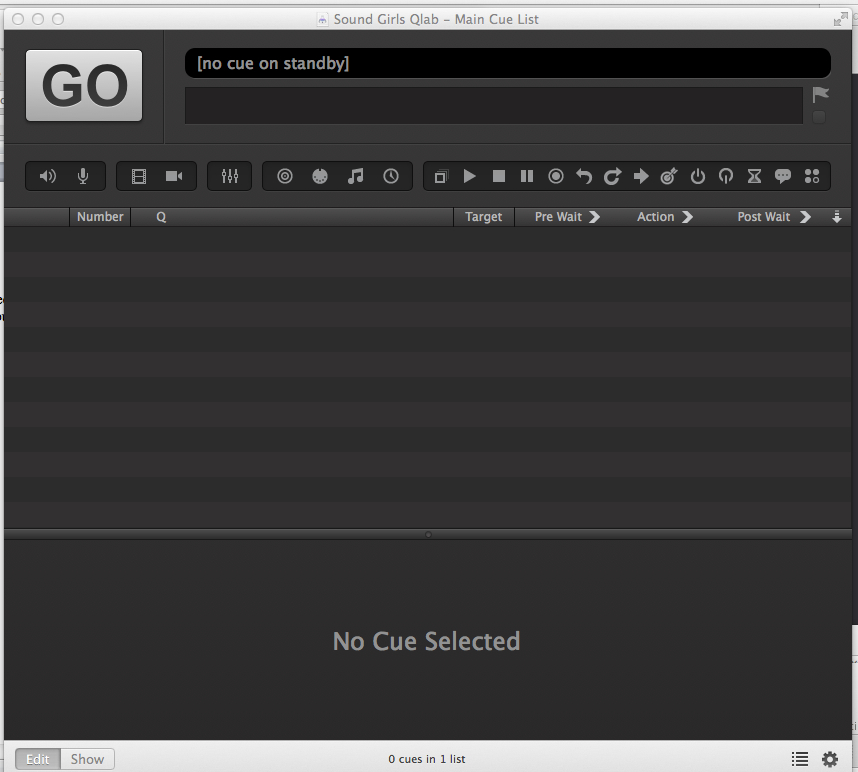
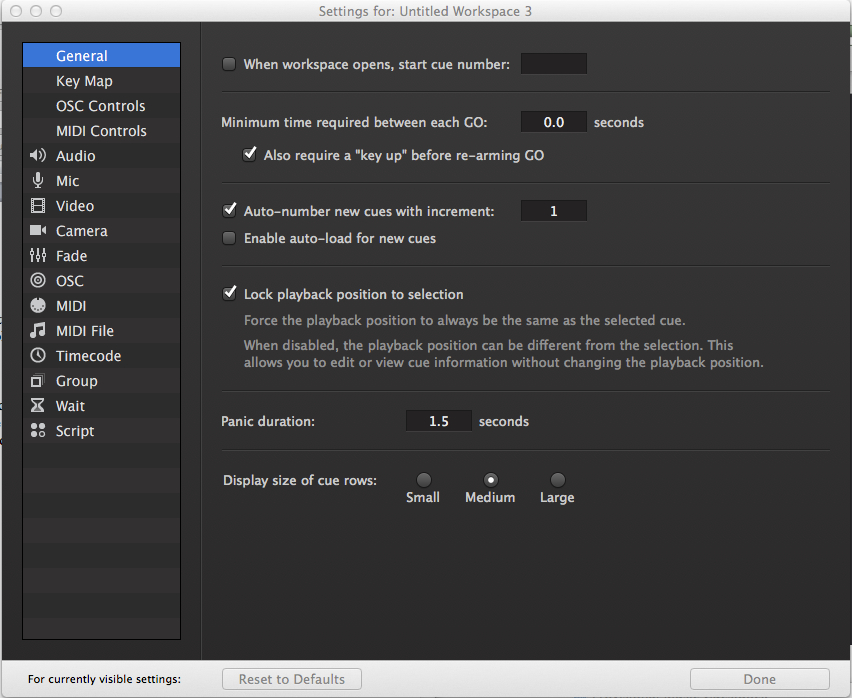
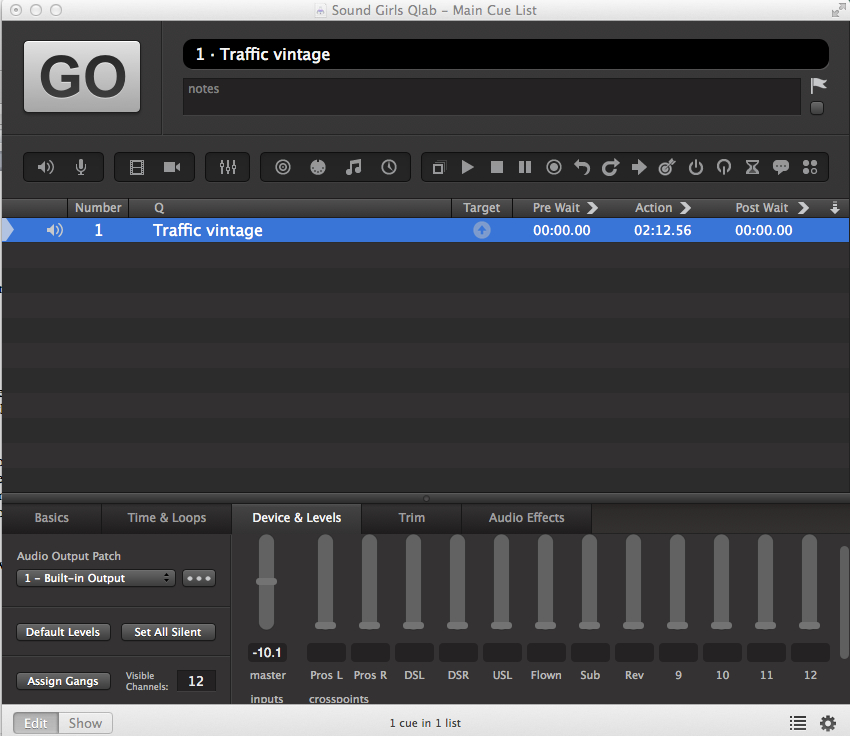
The folks at Figure53 (the makers of QLab) have some great (and free) resources.  Their instructional videos are fun and user friendly, and you can follow along on a free version of QLab, as long as you have a Mac computer.  Another super great Figure53 resource is the Figure53 Studio. There is a link on their website where they share experimental software for free!  It should be noted that there is no support for these programs, so if you get stuck or have questions, you’re on your own. One of my favorite resources for learning and teaching QLab is the QLab Cook Book.  This is a collection of QLab programming techniques and tricks developed by real-life QLab users! All three links are right here:

Figure53 Qlab

Figure53 Studio

Qlab Cookbook

If you are located in or near Southern California, you will be able to take advantage of a super cool Yamaha resource I discovered about ten years ago.  Yamaha has a program called “Audioversity” that offers all kinds of professional audio education and training activities. There is a healthy mix of self-paced training and instructor-led training.  The folks at Yamaha are invested in education, and will happily give student tours of the Yamaha Corporation in Buena Park. It’s great for students to see new equipment that is being developed, and all of the cool things going on inside Yamaha.  Check out this link for more info:

Yamaha Training

Whatever path you choose to use to introduce kids to audio, the important thing is to keep talking about it.  It’s one of the technical areas of entertainment that often fades into the background, and that’s what makes it so scary to beginners.  Audio is very accessible, and anyone can learn it. All it takes is a little patience and a great sense of adventure!


Choosing Software

There are many ways to control show cues on various programmes, and exactly which programmes used are entirely dependent on what the show’s needs are.

My upcoming show in RADA is proving to be a show that has much more than just a standard Qlab and a few microphones; I’ll also be composing for the show, but the composition is very much in fitting with the almost experimental and ‘found sound’ element of said show. It’s set simultaneously in 1882 and 2011, and there should be a ‘Stomp’-esque soundtrack that is driven by the sound, music, and choreography. This presents various challenges, and one of them initially has been deciding what to run the show on. Naturally, I’ll be using Qlab as the main brains of the show. However, Ableton Live will be utilized as well as live mixing.

Qlab is incredibly versatile, and as I’ve mentioned in previous posts, it can deal with OSC and MIDI incredibly well. In terms of advanced programming, you can get super specific and create your own set of commands and macros that will do whatever you need it to do, and quickly. Rich Walsh has a fantastic set of downloadable scripts and macros to use with Qlab that can all be found on a Qlab Google Group . Mic Pool has the most definitive Qlab Cookbook that can also be found here  (as with OSC and MIDI, you will need a Qlab Pro Audio license to access these features which can be purchased daily, monthly, or annually on the Figure 53 website).

To get Qlab to talk to Ableton is relatively straightforward – again, it’s all MIDI and specifically Control Change. MIDI is incredibly useful in that per channel, we can achieve 128 commands, and each channel (which is up to 8 output devices in Qlab V3) can be partitioned off for separate cues (i.e. Channel 1 might go to Ableton, Channel 2 might go to Lighting, 3 might be Video, and so on). Couple the Control Change with both Ableton’s MIDI Input Ports and its MIDI Map Mode, and you’re on your way to starting to control Ableton via Qlab. Things can get as specific as fade up/down over certain times, fade back up over certain times, stop cues, start loops, and generally control Ableton as if you were live mixing it yourself. The only thing to be wary of at this stage is to ensure that all levels in Ableton are set back to 0db with a separate MIDI cue once desired fades, etc. are completed – Ableton will only be as intelligent as it needs to be!

Using both macros/scripts and sending MIDI cues to Ableton are all features that I will cover in a separate post, only because they deserve their own post to understand all of the features.

So Ableton can do a lot, regarding controlling a show, and it does give us the flexibility to work, but artistically it also opens up a whole new world of opportunity. In RADA we are fortunate enough to own several Ableton Push 2’s, and they’ve very quickly become my new favourite toy! Push is useful as a sampler at its core, but there is so much flexibility that will be incredibly helpful during this next show. I can create loops, edit times, effects, sample rates, and can load any plugins simply; for me, it’s completely changed the live theatre game. I can react in real-time in the rehearsal room based on the choreography and can load new sounds from a whole suite of instruments and drum packs.


I’ll let Ableton themselves tell you more about the Push and what it can do – I’ve only recently started to use Ableton, so it’s as much as voyage of discovery for me, as I’m sure it is for you! More can be read on their website.

I primarily also use Pro Tools for editing any SFX and dialogue; this is because it’s a programme I’ve come to know very well and find that it is dynamic enough for what I need to do. I can again, load plugins quickly, it’s versatile and can load hundreds of tracks, and can talk to external hardware simply (such as the Avid Artist Control which we have in RADA’s main recording studio).

I also sometimes use Logic Pro as well, although I would only use this for music editing. This is because I prefer its ability to quickly load time signatures and is elastic enough that whenever a new track is loaded, it quickly adapts to the time signature on imported audio, and often comes pre-loaded with a vast amount of samples and plugins as standard.

With Ableton edging its way in, however, I might just have to choose a favourite soon because for me Ableton can often provide more realistic sounds, greater flexibility in drag-and-drop (wildly editable) plugins, auto-looping, and can be easily controlled in a live setting.

Often with software though, as with hardware, it’s more about what the sound designer or musician is comfortable with using and what the desired outcome is for the show.

The Encounter: A Sound Design Review, Part 2

Part 2: The sound operators – behind the scenes with Ella Wahlström and Helen Skiera

Last month, I reviewed Complicite’s The Encounter from a sound design perspective. This month, I wanted to get an insider’s view from the sound operators, Helen Skiera, and Ella Wahlström.

KirstyGillmore-March2016-pic1A quick recap for context: The Encounter is a one-actor show directed and performed by Simon McBurney, with sound design by Gareth Fry with Pete Malkin. It incorporates binaural technology, voiceovers, live looping, and sound effects to transport us into different environments as diverse as the Amazon and Simon’s living room. The audience experiences the sound through headphones worn throughout the two-hour performance.

I’ve heard The Encounter described as a play for “one actor and two sound operators”, and I feel this sums up the important role of the sound design in the show. I think any audio person who has watched the play will recognise the astounding feat of achieving that level of accuracy, clarity, and subtlety night after night. So how does the magic happen? Over to you, Ella and Helen.

You’re both sound designers as well as operators. Can you tell me a bit more about your respective backgrounds in sound?

Ella: I’ve studied violin since I was a child and had been part of my school’s tech team when I discovered theatre sound design as a teenager. It suddenly seemed to combine all my areas of interest and skills. For a couple of years, I did various amateur and semi-professional sound gigs in Finland before I decided to move to London in 2010, and here I completed a Bachelor of Arts in Performance Sound at Rose Bruford College of Theatre and Performance. Over the past six years, I’ve gradually built up my portfolio as a Theatre Sound Designer in London.

Helen: I started as a musician, and I took an interest in technology to record the bands I was in, and actually, my GCSE music pieces – that was back in the days of small Tascam Portastudios. Using various home/school recording setups, I started to understand how a desk worked, and with that knowledge I ended up, while at university, working with the Dundee Rep Community Theatre, making music and setting up PA systems for shows. I also started to get work as a live sound engineer for bands when I lived in Edinburgh. It wasn’t until much later that I discovered sound design was an actual role in theatre. When I did, I wanted to learn from the beginning, so I observed designers whose work I enjoyed,  and work experience, and every low/unpaid fringe show that I could take on. I was very fortunate to be taken on as an operator at the Royal Court Theatre and spent about two years working on some incredible shows. These included one of Gareth Fry’s  – Sucker Punch, which was the first time I’d seen Ableton and a Launchpad, which was very influential for me.

How did you become involved with The Encounter?

Ella: I had worked for Gareth Fry as an associate sound designer before, and I’ve also done a couple of Complicite research & development workshops as a sound operator and designer. So I guess I was a safe choice to be asked to come on board.

Helen: Gareth was looking for someone to do something in rehearsals for two weeks. I had no idea what it was, but I was free, and I’ll take any opportunity to work with Gareth. That was September 2014, and I’m writing this from Athens where we are currently performing the show, and, amongst other projects, I’ve been working on this ever since then.

The Encounter requires two sound operators, which is unusual for theatre production, and in particular for a solo show. What are your different responsibilities on the show?

Ella: I operate the music and sound effects side of things. I have a Mac Mini and a YAMAHA QL1, I run QLab and Ableton Live on the Mac, using a go-button, two Beringer BCF2000 controllers with eight faders each, and a launch pad.  We’ve programmed the big sequences in QLab, and we use Ableton to run a lot of continuous tracks, like music, atmos and drones. The QLab cues trigger and reset Ableton tracks so that I can ride the volume levels on the BCF faders according to the performance. On the launch pad I have spot effects and some backup tracks on Ableton, this allows me to fire tracks out of the QLab sequence.

Whenever there are any changes made to the show, which there are quite often, I’m responsible for reprogramming and implementing new recordings into the show. I do a daily rig check, which includes checking all my operating equipment, the PA, onstage speakers, the show iPod, and my MIDI connection to lighting and video. Luckily our sound supervisor has the responsibility of checking all the headphones daily with the in-house crew. I often run Midi Monitor to gather logs of the show, so after every show, I save these logs and the current QLab file.

Helen: I operate the microphones and a system of devices that loop Simon’s voice and assist him to loop himself. I have a Yamaha QL1 desk, two Mac Minis (one for backup) running Ableton Live (for looping and some vocal effects), and two Qlab files, with no audio, but MIDI commands to enable all the control surfaces, desk and software to communicate. There’s one BCF fader bank, one Bob (custom-made button box), one launchpad, and one icon fader bank. For my preshow checks, I check that everything works: all mics, all pitches, vocal effects, looping from my controls, and looping from the controls on stage. There’s no written check-in program, so it’s probably less formal than the average show checks.

What backups do you have in place?

Ella: Pretty much everything that can go wrong has gone wrong at some point during the show or rehearsals, so there are a lot of backup solutions implemented. I’m running a backup computer, which tracks the main computer so if anything happens to the main computer I can just swap over and change to a backup patch on my desk to continue the show on the backup. Within the show system, on my launchpad, I also have backups of all the tracks played on stage through the iPod and also all the main atmos, drones, and music tracks, so if anything happens to QLab, or on stage, I can bring in a track to cover or mask. On my desk, I also have the option to route the onstage speaker’s feed straight to the audience headphones in case there’s anything wrong with the wireless speaker or the radio receiver on it.

Helen: I have a second Mac with the same software, but if other units were to fail, we would have to revive them or continue without them. Because there isn’t a series of linear events that has to happen the same way each night in the same order, there are generally more options of how to do the same task, so there have been occasions when I’ve had to be a bit creative with problem-solving mid-show.

Yes, I imagine that operating sound for a show as aurally complex as The Encounter has both challenging, and rewarding, aspects.

KirstyGillmore-March2016-pic2Ella: The most challenging aspect of operating the show is definitely the ever-changing performance. It’s a one-man show and Simon treats us as fellow performers and likes to keep the show alive by trying new things and changing things around a bit. He knows our restrictions quite well but ever so often pushes the boundaries and keeps us on our toes. It’s also just over two hours long and full of sound, I think my longest break between sound cues is about two minutes. So operating takes a lot of concentration, and you really need to get into the story and the performance to keep up and stay within the rhythm. But when it all works together and I create a good flow with the voice-over dialogues I have with Simon, and I can feel his next move on stage, it’s a magical show, and it’s very rewarding to be part of the experience we create for the audience.

Helen: The challenging parts are kind of similar to the rewarding parts – it takes a lot of concentration and focus, and this is continuous throughout rehearsals as well as performances. We’re so actively part of it all the time. During rehearsals and performances, we create the material as it happens; it’s not the same as when you just replay the creative elements that you made earlier. So it can be exhausting, and very daunting at times, but this is also what makes the show such a brilliant experience for an operator.

In what other ways is operating The Encounter different from operating sound for other, more traditionally produced, plays?

 Ella: In more traditional theatre productions, the operator aims to deliver the same show night after night, and the sound designer should be able to come in at any time during the run and find the show pretty much as they left it on press night. On The Encounter we’re adapting the show all the time, I save a new QLab file every other night after having reprogrammed something.

Helen: For a traditionally produced play, in my experience, design is aiming to create the same experience for every audience every night, with fixed levels and cue points that cannot be changed, and would not be changed by an operator anyway. With The Encounter, it is more like being armed with a series of tools, or instruments, ever-developing, and the show starts, and you do whatever you think/feel should be done. Yes, the main structure of the show has a rehearsed form and what I do is within that form, but potentially, something different can happen at any moment. I do have to look at the stage, and particularly Simon, pretty much for the entire two hours. I can glance down to operate the loopers, but looking away for more than a second usually means I miss something.

I imagine that having to work at that level of responsiveness might require you to create bespoke hardware solutions?

Helen: We initially mixed the show conventionally, but found it was getting more and more difficult to do the changes quickly. Taking other mics down as well as bringing up a fader, and doing that with one hand while using the other to loop wasn’t efficient enough. Gareth’s solution was to create “Bob”, which is a box with 12 buttons that each send a MIDI message (like a Qlab GO box). The MIDI messages go into Qlab, and Qlab sends control changes to the QL1, to bring up individual microphones and pitches, and take the others down instantaneously. We are currently on Bob Mark 2; the original Bob had the buttons arranged in a single line, which meant I needed to look at the buttons to get the right ones. For Bob 2, I designed a pattern for the buttons arranged in threes, which means I can feel around the surface without having to look down.

As well as multiple mics, Simon uses various devices to create and playback sound on stage, including a wireless domestic hi-fi speaker and an iPod. I remember Ella saying the wireless speaker requires you to trigger occasional bursts of noise to prevent it from switching off. Are there any other little quirks that you have to be aware of during the show?

Ella: The iPod is another risk-averse element as it’s on stage and out of our reach, so whenever Simon plays anything from it, I have to be ready to play a backup track, in case he turns the volume down accidentally or something else unexpected happens.

Speaking of unexpected sounds, using live looping must run the risk of inadvertently involving the audience when they cough or make other sounds. I’ve heard the story about when a school group came in and made a lot of noise which was picked up by the binaural head, and the group thought it was hilarious when they could hear it played back as part of a loop. How do you cope with unexpected ambient sounds?

Helen: I do have backups, but they are definitely a last resort. Usually, I grab the loop; then if there is a cough, I delete it and grab another one. It’s a risky game, though, as each time you discard a loop, the source sound may stop being made, and then there’s not much you can do. But Simon is very adept at noting when there is coughing, and he will keep making the sound for a bit longer to allow for a clean loop.

How does the show change from a sound perspective when you take it on tour – what do you need to take into account when you’re in a different venue?

Ella: We install the headphone system in each venue, which means our sound supervisor has to plan all the cable runs and amp placements every time as the venues vary in shapes and sizes. You would also think that a show that you only hear through headphones wouldn’t be too dependent on the acoustics of the room, but the acoustics affect the clarity of the sound quite a lot. Also, the noise level of an auditorium is crucial to the flow of the show as the binaural head is used throughout. If the space has noisy air-conditioning, for example, it can be problematic when swapping between the close-up microphones and the binaural head. When you create layers by looping the binaural recordings the noise floor rises with each layer.

Many thanks to Helen and Ella for this interview. There’s more about the making of The Encounter here and for upcoming tour dates go here and scroll down under “Tour”.


QLab: An Introduction


QLab is my software of choice for playback in musicals and plays. QLab is a Mac-based piece of software that I have found it to be robust, flexible, and quick to program. If you need a playback engine for music tracks or sound effects and you have a Mac, then it’s absolutely worth looking at.

When you first open up QLab, you will see an untitled workspace (Fig. 1).

Fig. 1

In order to optimize things while you are programming, it’s wise to set a few preferences. These can be changed later, but I’ll share the way I set things up. At the bottom right-hand side of the workspace is the icon of a cogwheel. Click that and you get to play with the settings behind the screen. (Fig 2)

Fig. 2

If you click on the audio menu on the left-hand side, it will take you to the section where you can set the output device, label the outputs, and set the levels for any new sound cues. I set new cues to be silent with all the cross points in so that I can fade them up to set level rather than fade them down. Then I select the group menu and select the “Start all children simultaneously” option. Clicking “Done” will flip the screen back to the workspace.

Getting audio in is as simple as drag and drop. When you drop something in, a new set of tabs appear at the bottom of the workspace in the inspector. (Fig 3) The tabs I use the most are Device & Levels, Time & Loops, and Audio Effects. As this particular sound effect is something that will run continuously under a scene, I’m going to want to loop it. I’ll need to select the outputs it’s going through and I also may want to add some EQ. That’s all available there in the software.

Fig. 3

Playing just traffic on its own could get a bit monotonous, so I want to add a few car horns, but I don’t want to trigger them all individually. In order to do this, I need to create a group cue.  By clicking on the square outline on the top menu bar (or select it from the cues menu) a box will appear in the workspace. As I’ve chosen all children at once, it will be a green one.  Drag in the audio files you want to include in this cue.  They can now be treated together.

If I were to trigger this cue as it is, then both wavs would start playing at the same time and the traffic that I had looped would play forever. That’s not what I want to happen. To fix this, I’ll put a pre-wait in on the car horn so it starts a bit later. At some point, I’m going to want the traffic to fade out, so I will need a fade cue. I can drag the faders icon onto the workspace and assign the cue I want to effect by drag and drop.  The fade length can be changed, as can the fade curve. (Fig 4)

Fig. 4

At the moment, you only have a cue list and not really a show file, so you need to bundle the workspace.  This will collect all the audio files you have dropped onto the workspace, make a copy of them and place them together in a folder with the workspace.  When you do this, you can transfer the whole folder to anywhere you want and take your show with you. Fig 5 is an example of what happens when you don’t bundle a workspace. The red crosses show that QLab can no longer find the audio files.

Fig. 5 shows the preshow of a show I recently designed. The show was set at the end of World War II and you can see there are lots of loops triggering. In the pre-wait column, you can see the delay time I put in for each of the audio files to trigger. They then looped at various lengths until the next cue, which stopped the preshow and the SFX that started the show were triggered.

Fig. 5

QLab is made by figure 53. You can download a free version of it here: http://figure53.com/qlab/ The free version gives you two channels and doesn’t give you anything under the audio effects tab. You can still use it to create a show and then rent the software by the day from figure 53. Or, if you can make do with only two outputs, you can use it to run a show.

With this information, you can create a basic cue-list and get a show together. As you dig deeper, you will find you can vamp and de-vamp cues, trigger or be triggered by midi, and much more. QLab can also be used for video.  The complexity of your cue list is up to you, and everyone will use it in a way that suits how they create a show.

X